
Margill users or users without an ERP connected to Transphere
Frequently Asked Questions
How to add a client ?
To add a client, proceed as follows:
- Access the ACCEO Transphere homepage.
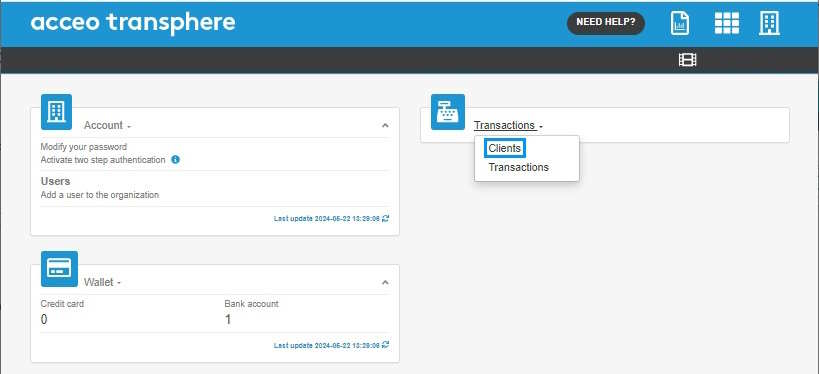
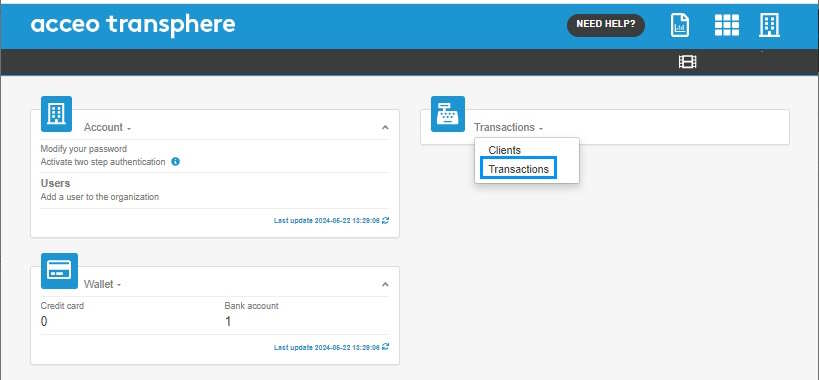
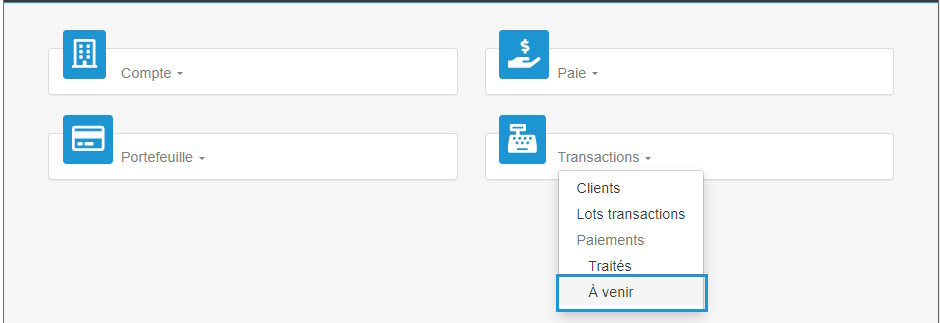
- Click Transactions and select Clients.

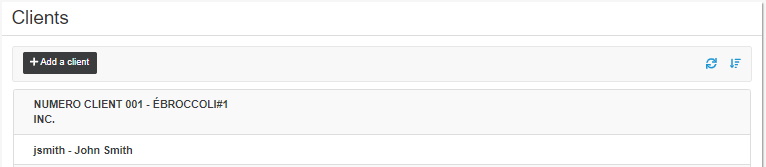
- In the Clients page, click Add a client.
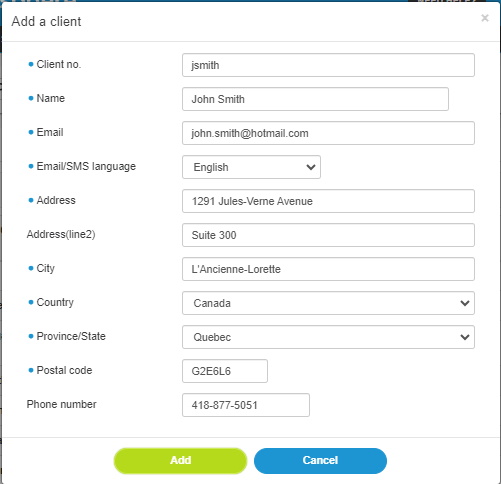
Note: The fields preceded by a blue ![]() dot are mandatory.
dot are mandatory.
- Enter the Client no., their Name and Email
- Select the Email/SMS language to use to communicate with the client.
- Enter their Address and Phone number.
- Click Add to add it to the client list.
How to add a bank account ?
To add a bank account, proceed as follows:
- Access the ACCEO Transphere homepage.
- Click Transactions and select Clients.
- In the Clients page, click the appropriate client to open their file.
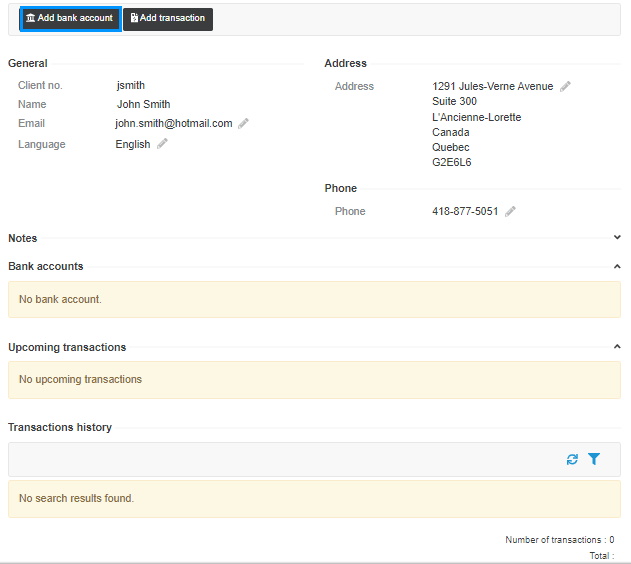
- Click the Add bank account button.
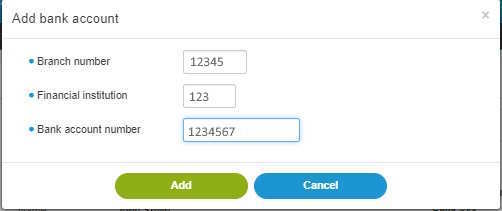
Note: The fields preceded by a blue ![]() dot are mandatory.
dot are mandatory.
- Enter the Branch number, Financial institution code (e.g. 815 for Desjardins) and the Bank account number.
- Click Add. A message indicates that the bank account has been successfully added.
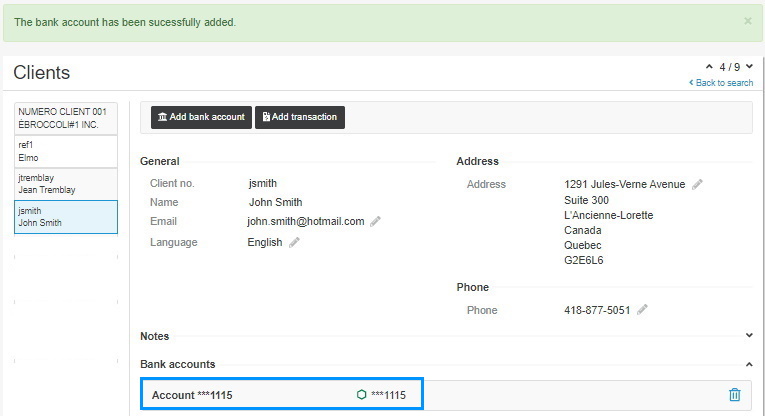
In the client file, the bank account is added under their contact information.
How to add a transaction to a client ?
To add a transaction to a client, proceed as follows:
- Access the ACCEO Transphere homepage.
- Click Transactions and select Clients.

- In the Clients page, click the appropriate client and open their file.

- Click the Add transaction button.

Note: The fields preceded by a blue ![]() dot are mandatory.
dot are mandatory.
- Select the Type of transaction (e.g. debit).
- Enter the Amount of the transaction.
- Select the Bank account.
- Click the calendar to select the Date.
- Enter a Reference number if required.
- If it is a transaction which repeats periodically, check the Recurrent transaction Fields are displayed below.
- Select the invoicing Frequency: monthly, biweekly or weekly.
- Specify the Day of the month on which the transaction must be submitted.
- Enter the Number of payments required to settle the total transaction or check the Unlimited box if it is an unlimited number of payments.
- Click Add. A message indicates that the transaction has been successfully added.
Note: If the transaction is recurring, the end date in the range of dates is excluded from the payment. For example: For a one-year recurrence in 12 payments, the system displays a range from October 1, 2024, to October 1, 2025. The end date is excluded from the calculation. The date of the last payment will be September 1, 2025.
How to add batch transactions ?
To add batch transactions, proceed as follows:
- Access the ACCEO Transphere homepage.
- Click Transactions and select Transactions.
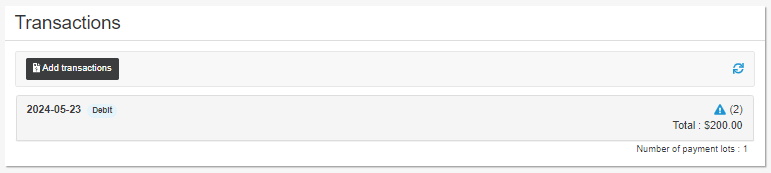
- In the Transactions page, click the Add transactions button.
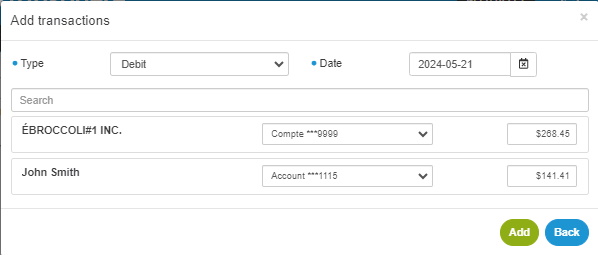
Note: The fields preceded by a blue · dot are mandatory.
- Select the Type of transaction (e.g. debit).
- Click the calendar to select the Date, i.e. the date of the transfer.
- For each client concerned, select the appropriate bank account and enter the Amount of the transaction.
- Click the Add A message indicates that the transactions have been successfully added.
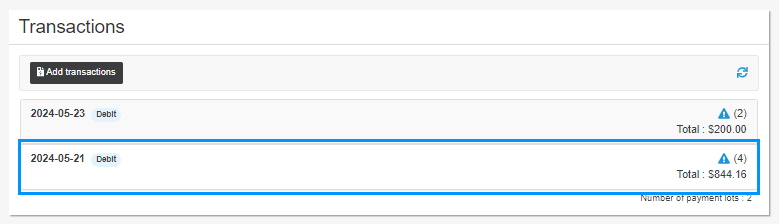
In the Transactions page, the addition of a batch of four transactions is displayed. The Total amount of the four transactions is also indicated.
How to send transactions to financial institutions ?
Transactions are sent to financial institutions twice a day, at 1:00 p.m. and 6:00 p.m. on working days.
In a day, transactions entered before 1:00 p.m. are sent to financial institutions at 1:00 p.m. Transactions entered between 1:00 p.m. and 6:00 p.m. are sent at 6:00 p.m. Transactions entered
after 6:00 p.m. are sent the next day.
![]() This button displays the list of confirmed transactions, i.e. transactions which have
This button displays the list of confirmed transactions, i.e. transactions which have
been sent and then processed by financial institutions.
![]() This button displays the list of cancelled transactions.
This button displays the list of cancelled transactions.
![]() This button displays the list of transactions rejected for non-sufficient funds,
This button displays the list of transactions rejected for non-sufficient funds,
invalid account number, frozen account, etc.
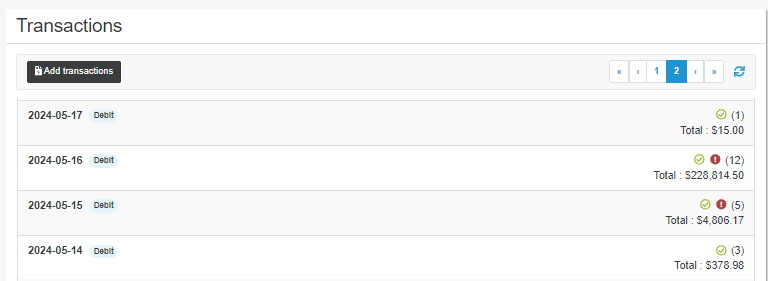
In the list of transactions, click the line of a batch to view the detail of the transactions included in the batch.
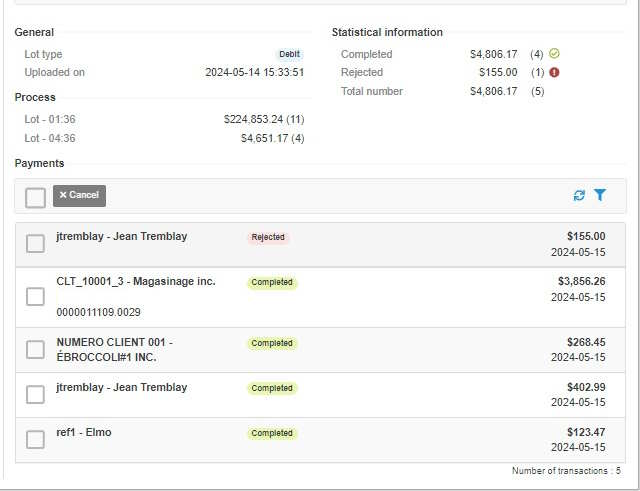
- General: Indicates the type of batch (e.g. Debit) and the date and time it was uploaded.
- Statistical information: Displays the total number of transactions and the number of confirmed, cancelled and rejected transactions.
- Processing: Indicates the time and amount of each batch sent during the day.
- Payments: Displays the detail of the transactions included in the batch.
| Status | Description |
|---|---|
| Waiting to be submitted | The transaction has been created in ACCEO Transphere, but it has not yet been submitted to be sent to financial institutions. |
| Submitted | The transaction is now submitted and ready to be sent to the financial institution.
It will be sent to the financial institution at the appropriate time. For a pre-authorized debit (PAD), the transaction is sent on the date specified for the debit (or the next working day). For a payroll, the transmission is made 48 working hours before the pay is deposited. |
| Cancelled | The transaction has been cancelled by a user. It will never be processed. |
| Rejected | The financial institution returned the transaction with an error code. The money will not be deposited or will be retrieved from the company’s bank account. |
| Mistaken | An error, usually technical, prevents the transaction from being processed. |
| Confirmed | The financial institution confirms reception of the transaction, and the funds will be transferred. Note: for payroll, this status does not apply. |
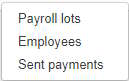
How does the Payroll module work ?
The Payroll module is used to create a pay for each employee, process payroll lots and view sent payments.
Access rights are required to manage payrolls. In the user file, Payroll section, various rights related to payroll can be granted to the user.
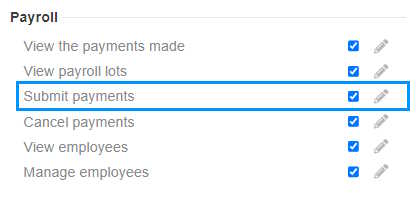
For example, in a business, a user can have rights to create employees and view various data related to payroll, without having the right to submit payments. In some cases, the payroll manager may be the only person to have the right to Submit payments.
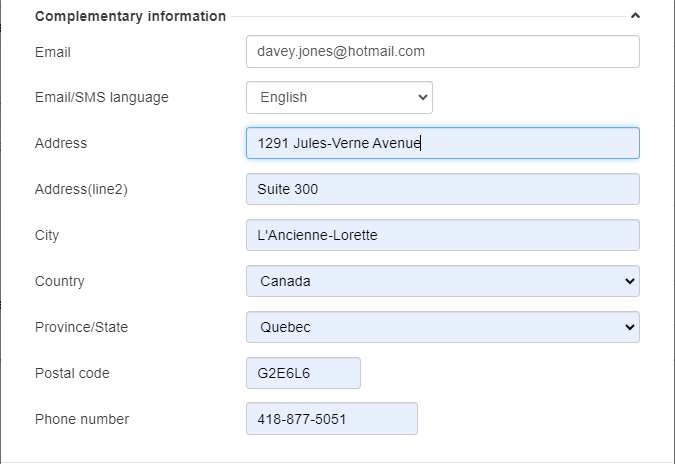
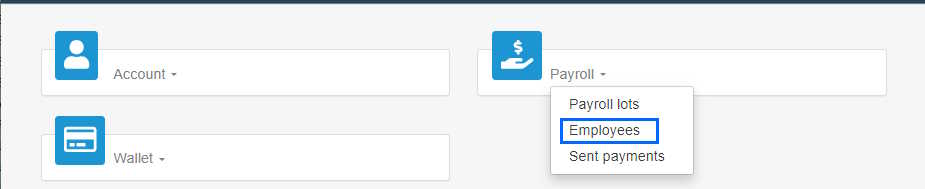
How to add an employee ?
To add an employee, proceed as follows:
- Access the ACCEO Transphere homepage.
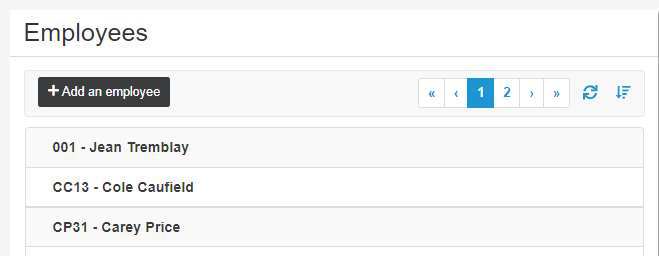
- Click Payroll and select Employees.
- In the Employees page, click Add an employee.
- Enter the Employee no. as defined in the payroll software and the employee’s Name.
- Enter the information related to their bank account, i.e. the Branch number, the Financial institution code (e.g. 815 for Desjardins) and the Bank account number.
- Click Complementary information to display the lower part of the page.
- Enter the additional information about the employee (email, address, etc.).
- Click Add to add the employee to the list of employees.
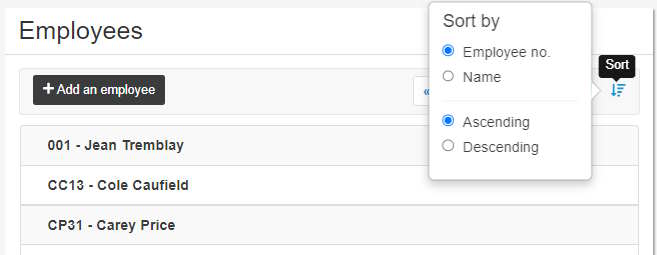
- To sort employees in the list, click the Sort button
 and select the appropriate sort options.

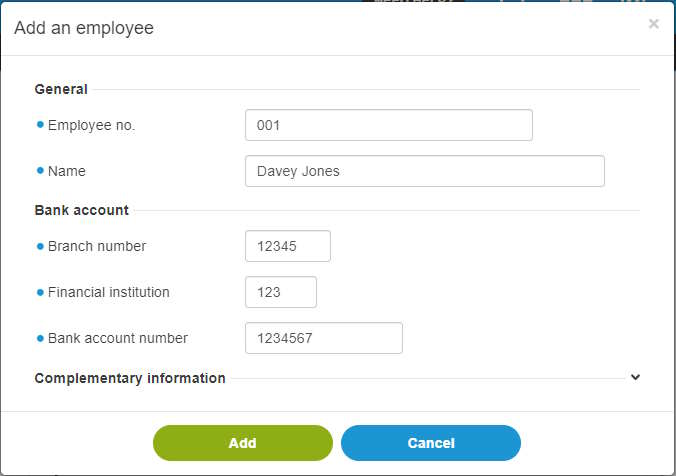
Note: The fields preceded by a blue dot ![]() are mandatory.
are mandatory.
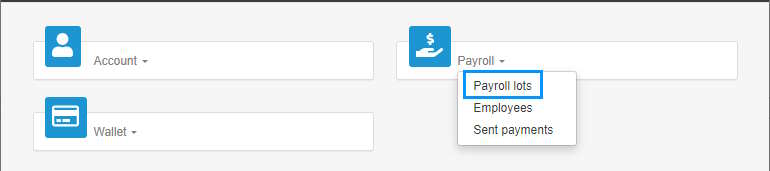
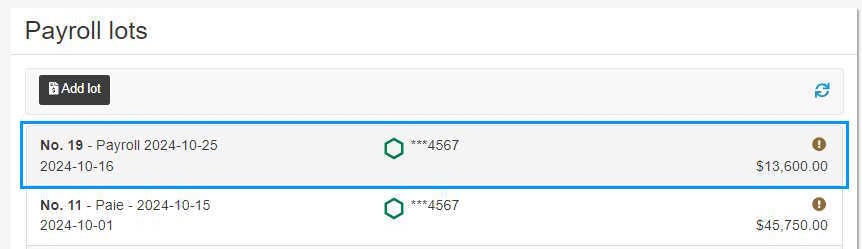
How to generate a payroll lot ?
Most of the time, payrolls are processed in lots for all company employees.
To generate a payroll lot, proceed as follows:
- Access the ACCEO Transphere homepage.
- Click Payroll and select Payroll lots.
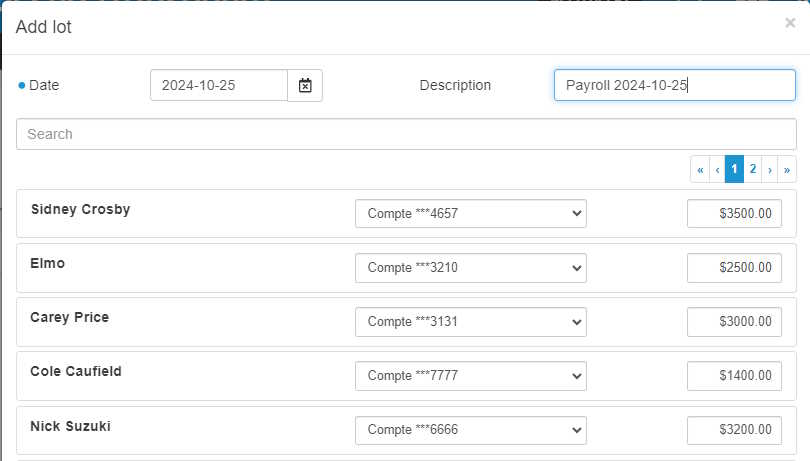
- In the Payroll lots page, click the Add lot button.
- Enter the Date of the payment. Note: Allow for 48 hours between the lot submission date and the expected pay date.
- Enter a short Description of the payroll lot so that it is easy to differentiate from the other lots. If no description is entered, the system displays the payroll deposit date by default (Payroll YYYY-MM-DD).
- The list below displays all company employees. For each employee, enter the net amount to pay in their bank account.
- If an employee has more than one bank account, the account can be changed, if required, by clicking the arrow.
- Once the amounts are entered, click the Add button at the bottom of the page. A message indicates that the transactions were successfully added.
- In the Payroll lots

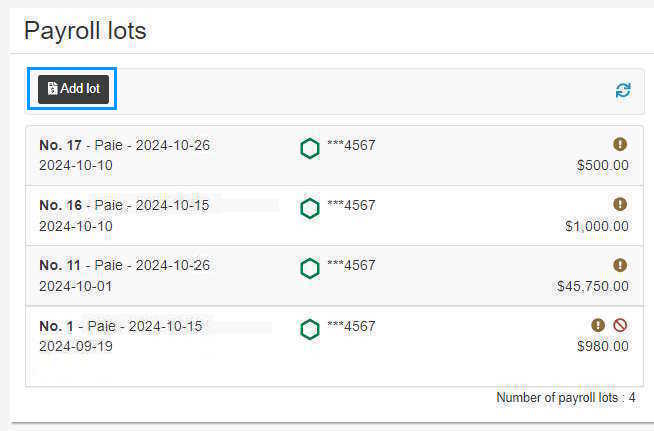

 Glide the cursor over this icon to display the number of payrolls waiting to be submitted in the lot.
 Glide the cursor over this icon to display the number of payrolls cancelled in the lot.
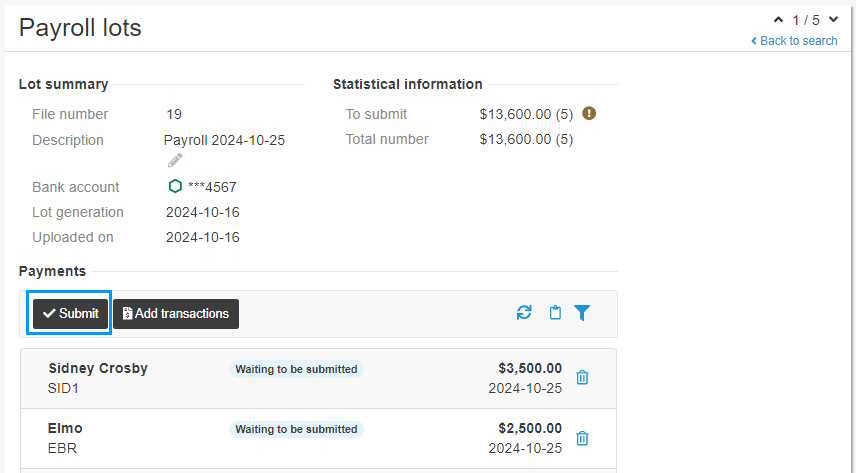
How to submit a payroll lot ?
Once the payroll lot has been generated, submit the payments so that the payrolls are deposited in the employees’ bank accounts.
Warning: Once the lot is submitted, it is closed and cannot be modified. Any other payroll generated for the same date will be found in a new lot.
To submit a payroll lot, proceed as follows:
- Access the ACCEO Transphere homepage.
- Click Payroll and select Payroll lots.
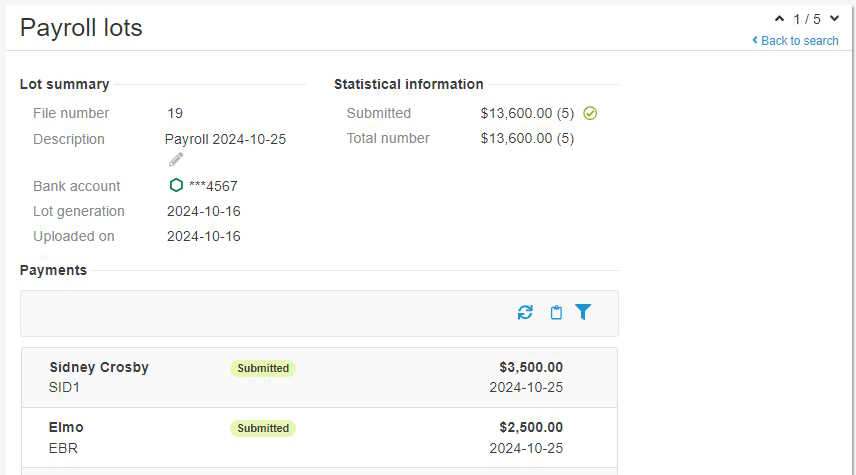
- In the Payroll lots page, click the line of the lot to submit to display the detail on screen.
- The Lot summary displays the lot number, the bank account from which the amount of the lot will be withdrawn, the lot generation date, etc. The Statistical information section indicates the $ amount to submit and the number of payrolls included in the lot. In the Payments section, the transaction status indicates Waiting to be submitted.
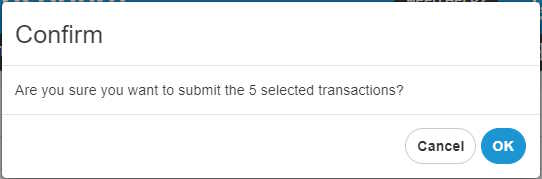
- Click Submit. A confirmation message is displayed.
- Click OK. A message indicates that the transaction was submitted successfully.
- In the Payments section, the transactions status indicates Submitted.
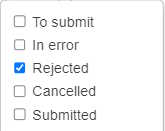
- To filter the list, click the Filter button
 .
. - Select the filter options to apply in the list.
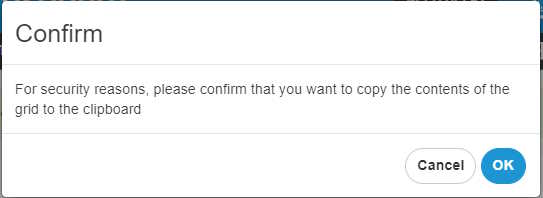
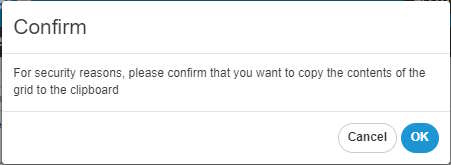
- To copy the content of the list of payrolls to import to Excel, click the Copy to clipboard button
 . A message requests confirmation.
 - Click OK. A message indicates that the content was copied successfully.
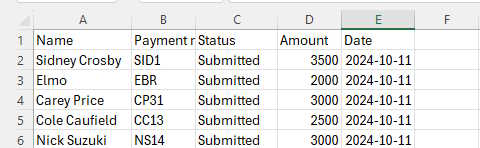
- Open Excel and copy the content of the Clipboard.
- The payroll information is copied in the file (employee name, payment no., status and amount of pay and payment date). Save the Excel file.

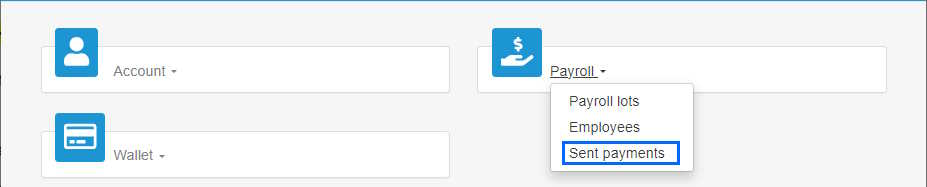
How to sent payments ?
The Sent payments list displays all payrolls which have been deposited in the employees’ bank accounts.
To view the sent payments, proceed as follows:
- Access the ACCEO Transphere homepage.
- Click Payroll and select Sent payments.
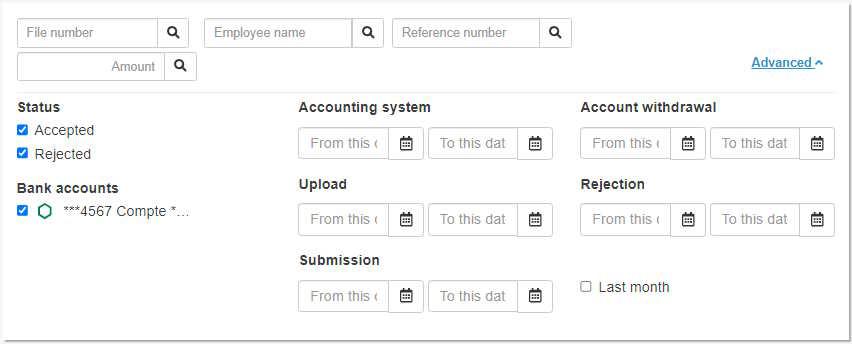
- Click the Advanced arrow to filter the list of sent payments by specifying the search criteria (file number, amount of batch, status of payments, lot submission date, etc.). The date below displays the payments that meet the specified criteria.
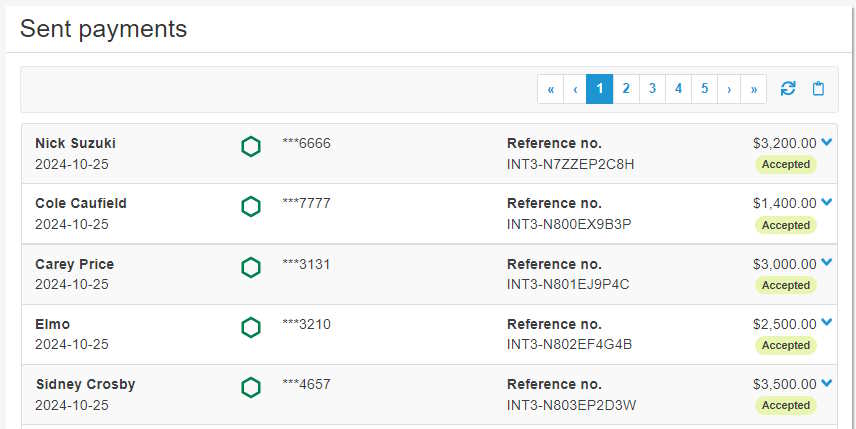
- The list displays the payments that have been sent: the employee’s name, deposit date, bank account number, reference number, payment amount and the Accepted status. If the
 icon is displayed next to the date, it means that the deposit date is different from the payment date that had been specified.
 - To copy the content of the list to import it to Excel, click the Copy to clipboard button
 . A message requests confirmation.
 - Click OK. A message indicates that the content was copied successfully.
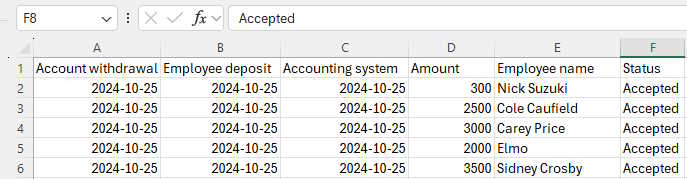
- Open Excel and copy the content of the Clipboard.
- The sent payments information is copied in the file (withdrawal date, deposit date, amount, employee name, etc.). Save the Excel file.


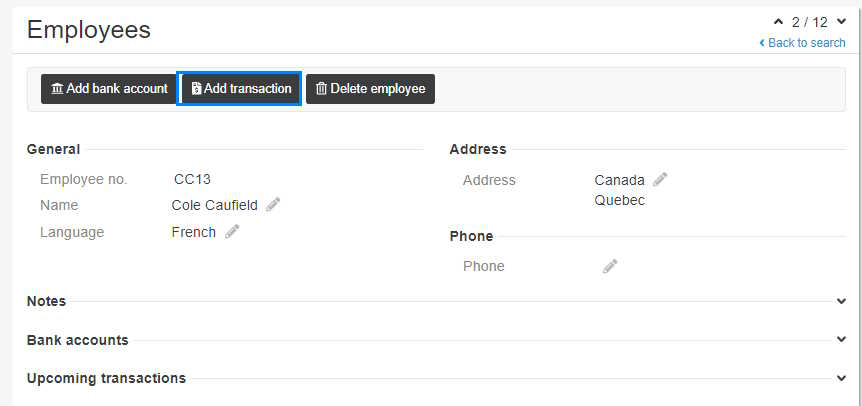
How to add a transaction to a single employee ?
Most of the time payrolls are processed in lots, but in some cases the payroll manager must pay a bonus to an employee or reimburse the employee’s expenses.
To add a transaction to an employee, proceed as follows:
- Access the ACCEO Transphere homepage.
- Click Payroll and select Employees.
- In the Employees page, click the appropriate employee to open their file.
- Click the Add transaction button.
- Enter the Amount of the transaction.
- The Bank account is displayed. If the employee has more than one bank account, click the arrow to select the appropriate account, if required.
- Enter the transaction payment date. Note: Allow for 48 hours between the submission date and the expected payment date.
- In the Reference number field, enter a short description of the transaction (e.g. bonus, expense account, etc.) so that it is easy to differentiate among the other transactions.
- Click Add. A message indicates that the transaction was added successfully.
- In the employee file, the transaction is displayed in the Upcoming transactions section.
- Its status indicates Waiting to be submitted. Transactions are submitted from the Payroll lots page (see Submit a payroll lot).

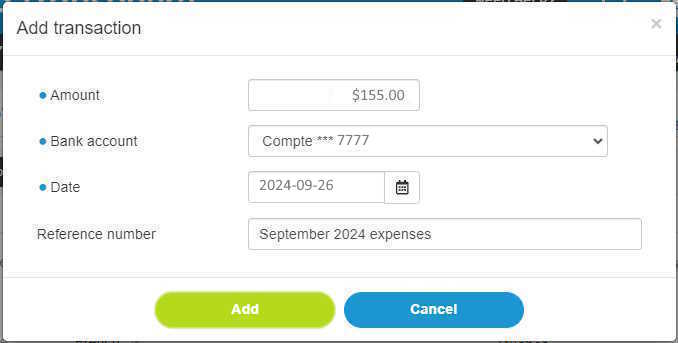
Note: The fields preceded by a blue dot ![]() are mandatory.
are mandatory.

How to consult or edit your account ?
To consult or edit your account, proceed as follows:
- Access the ACCEO Transphere homepage.

-
Click Account and select My account. The first section of the My account page displays the user’s personal information (name and Email/SMS
language), their affiliations (organization name) and login information (username and password).
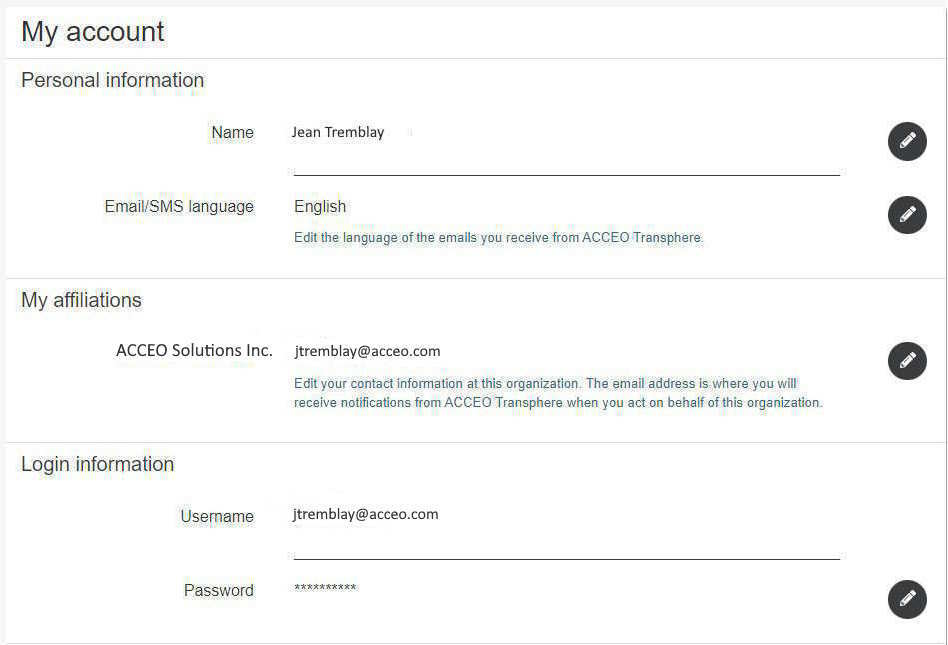
- To edit this section, click the appropriate pencil
 .
. - Once the edit is finished, click the checkmark
 to save.
 - The second section of the My account page displays the security information. This information is used exclusively to recover the forgotten username or password.
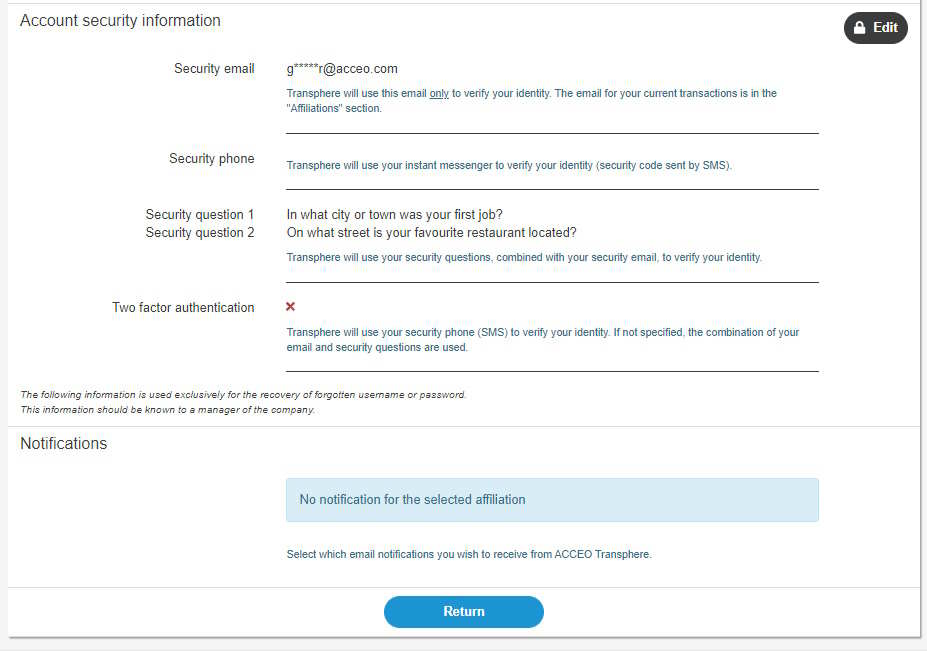
-
To recover your username or password, click Edit. A verification code will be sent by email to verify the person’s identity. The Account
Security Information page is displayed.
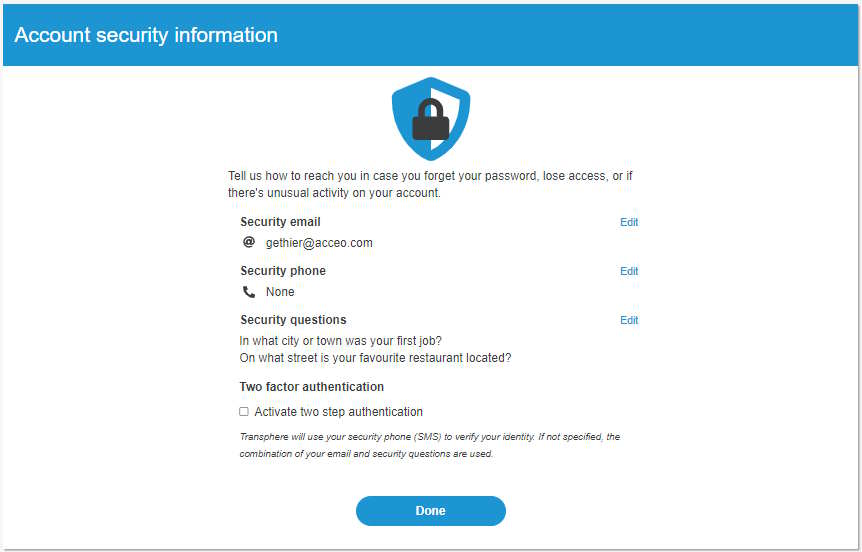
- From this page, the user can modify their security email, security phone, security questions and two factor authentication.
- The Notifications section is used to deactivate notifications sent by default by ACCEO Transphere.
How to consult or edit your organization ?
To consult or edit your organization, proceed as follows:
- Access the ACCEO Transphere homepage.
-
Click Account and select My organization. The first section of the My organization page displays the information of the organization to which
the user is affiliated.

- To edit this section, click the appropriate
 pencil.
 - The External applications section displays the applications related to ACCEO Transphere.
- To add an external application, click the
 button.
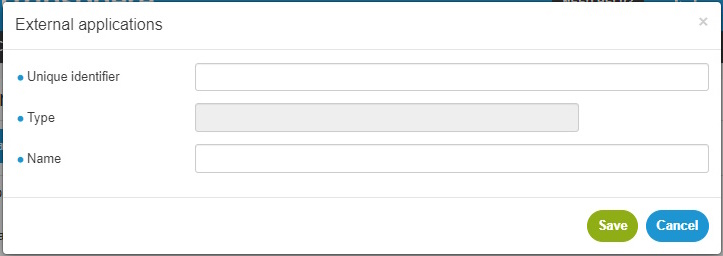
- Enter the unique identifier, the type and name of the application. The unique identifier comes from the external application.
- Save.
-
An organization number is then assigned and must be copied in the account software that will connect with ACCEO Transphere. This number is used to configure the accounting system to send
electronic payments to suppliers via ACCEO Transphere.

How to consult or edit a user ?
- Access the ACCEO Transphere homepage.

- Click Account and select Users.
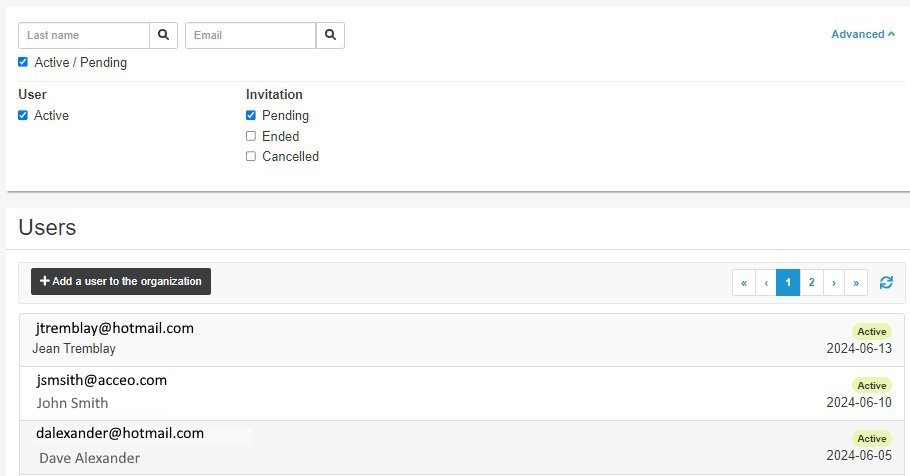
-
The list displays the users affiliated with the organization. In the upper part of the page, click the Advanced arrow to filter the list. For example, you can display active
users whose invitation is pending, ended or cancelled. - To consult a user file, click the appropriate line.
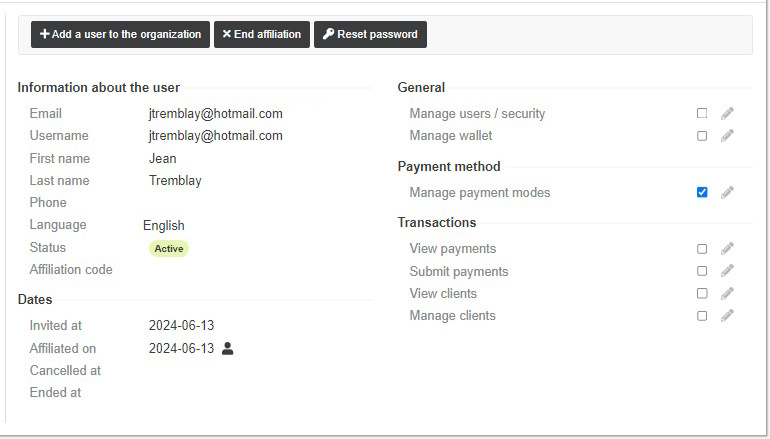
- The left section displays the user information (name, email, phone, etc.) and the invitation date, affiliation date, etc.
- The right section displays the access rights assigned to the user. Check or uncheck a box to give or remove user access to the option.
How to add a user ?
To add a user, proceed as follows:
- Access the ACCEO Transphere homepage.
- Click Account and select Users to display the list of users.
- Click the Add a user to the organization button.
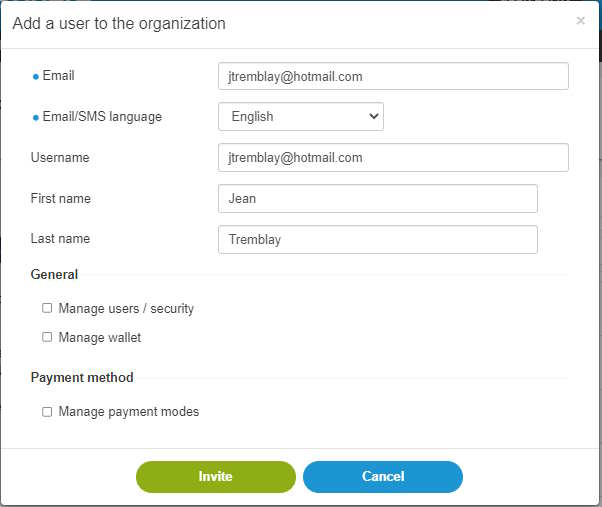
- Enter the user’s email address.
- Select the Email/SMS language.
- Enter the username (e.g. user’s email address). The username allows the user to login to ACCEO Transphere.
- Enter the first name and last name.
- In the General and Payment method sections, check the appropriate boxes to give the user access to these options.
- Click Invite. The user receives an email inviting them to affiliate with the organization.
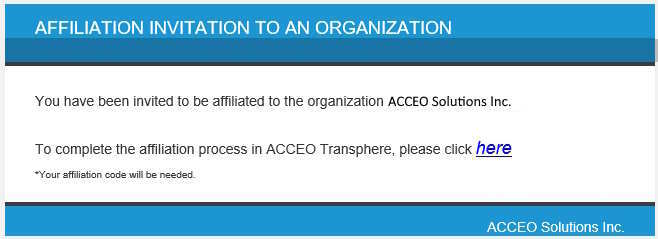
-
In the upper part of the ACCEO Transphere page, a message is displayed to indicate that an affiliation invitation has been sent to the user’s email address. An affiliation code is also
provided.

- Send the invitee the affiliation code so that they can complete their affiliation.
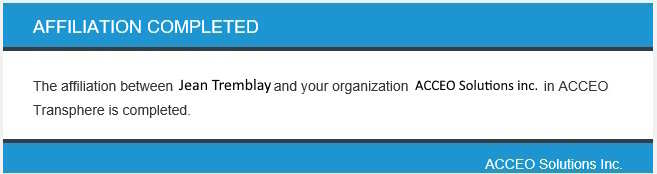
- Once the invitee is finished, a confirmation email is sent to confirm that they are now affiliated with the organization.
How to end a user’s affiliation ?
To end a user’s affiliation, proceed as follows:
- In the list of users, click the appropriate one to access their file.
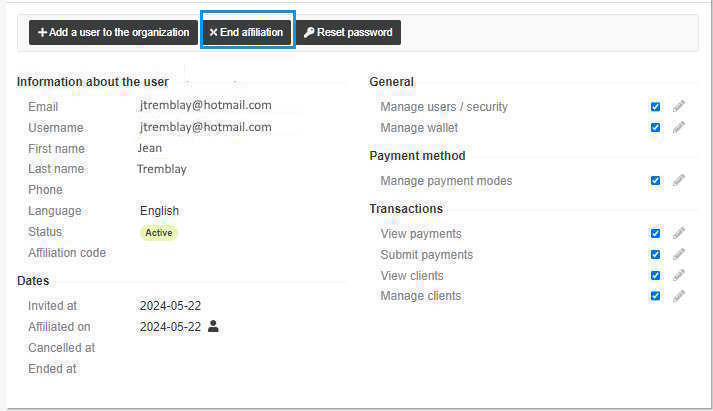
- Click the End affiliation button.
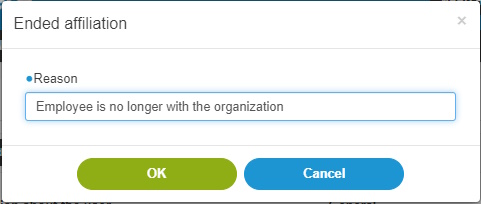
- Enter the reason the affiliation must be ended.
- Click OK. The affiliation between the user and the organization is ended.
How to reset a user’s password ?
To reset a user’s password, proceed as follows:
- In the list of users, click the appropriate one to select their file.
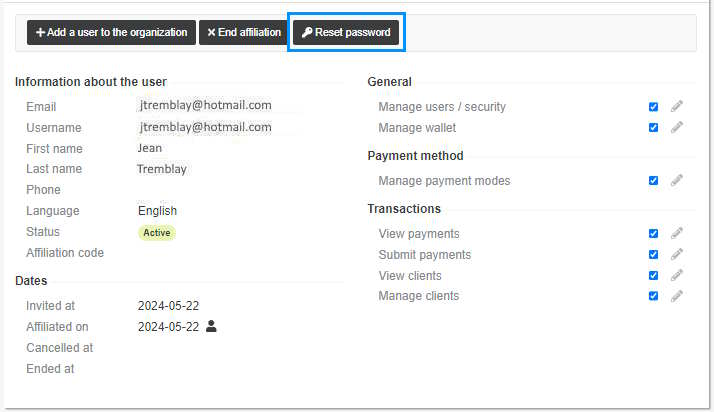
- Click the Reset password button.
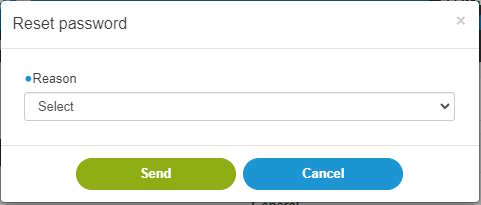
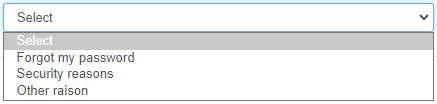
- In the Reason field, click the arrow to select the reason.
- Click Send. A link is sent by email to the user for the user to enter a new password. The link expires after 24 hours.
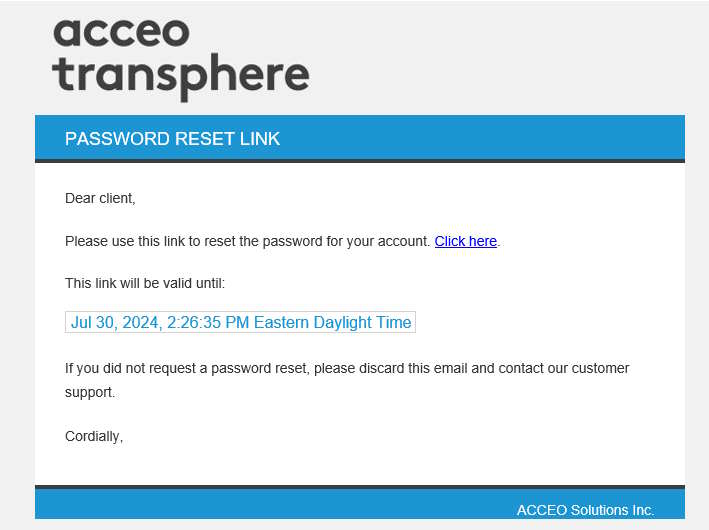
- Click the Click here link to reset the password.
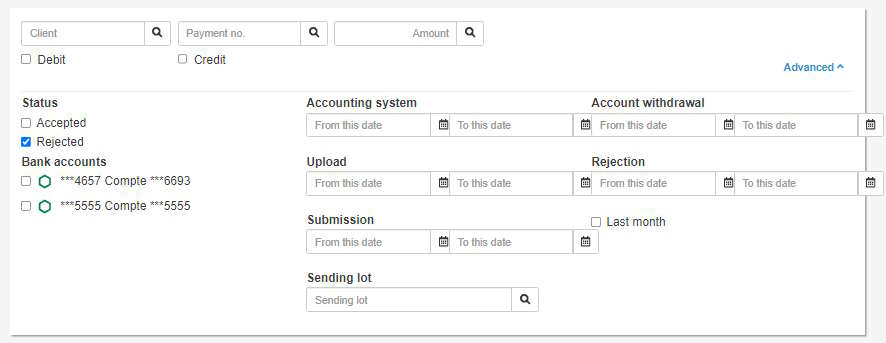
How to rejected payments report ?
Rejected payments are those which have been sent to the financial institution and which have been rejected for non-sufficient funds, frozen account, etc.
To view the rejected payments report, proceed as follows:
- Access the ACCEO Transphere homepage.
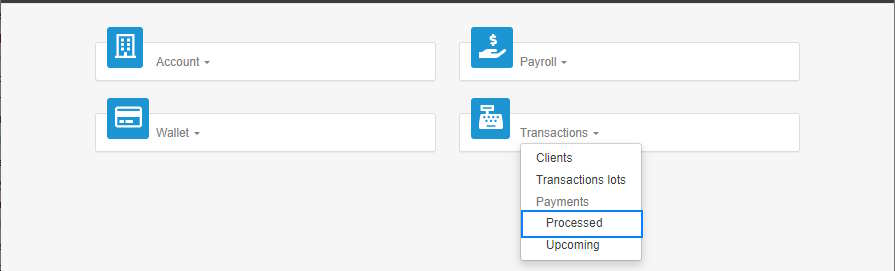
- Click Transactions and select Processed.
- In the upper part of the Payments page, click the Advanced arrow to define the report parameters.
- In the Status group, check the Rejected box.
- In the Rejection group, define a range of dates, if required. The list below displays the rejected payments according to defined criteria.
- To refresh the data in the list, click the Refresh
 button.
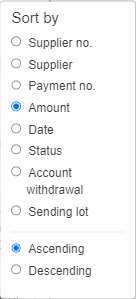
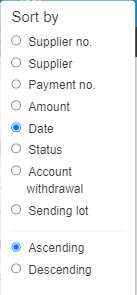
 - To sort payments in the list, click the Sort
 button and select the appropriate option.
 - To copy the content from the list to import it into Excel, click the Copy to clipboard
 button. A message requests confirmation.
 - Click OK. A message indicates that the content has been successfully copied.
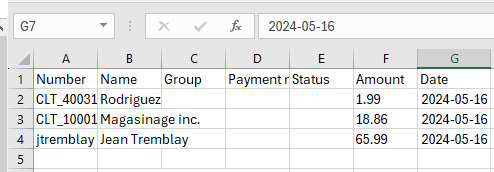
- Open Excel and copy the content of the Clipboard.
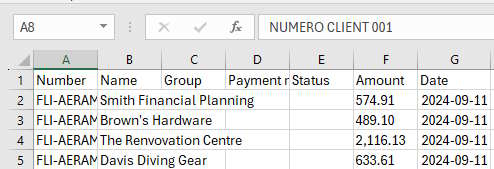
- The rejected payments information is copied in the file (number, name, amount, date, etc.). Save the Excel file.
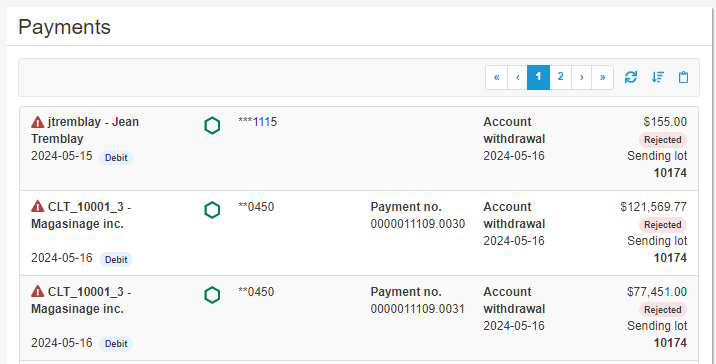


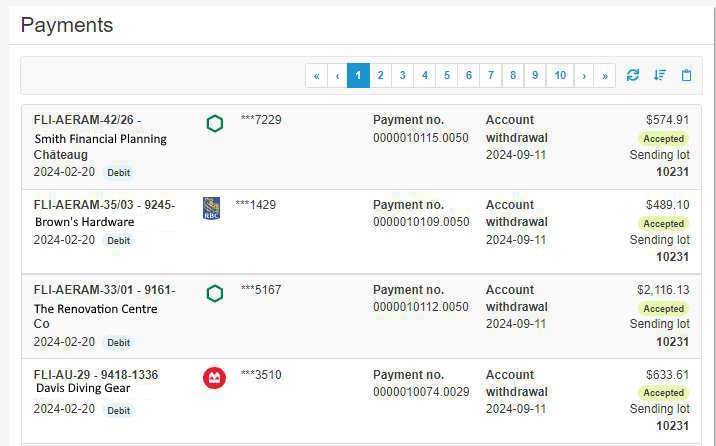
How processed payments report ?
Processed payments are those which have been sent to the financial institution and which have been processed. The list displays the accepted payments and rejected payments, if any.
To view the processed payments report, proceed as follows:
- Access the ACCEO Transphere homepage.
- Click Transactions and select Processed. The list displays the payments which have been processed, including payments which have been rejected, if any.
- To refresh the data in the list, click the Refresh
 button.
 - To sort payments in the list, click the Sort
 button and select the appropriate option.
 - To copy the content of the list to import it into Excel, click the Copy to clipboard
 button. A message requests confirmation.
 - Click OK. A message indicates that the content was copied successfully.
- Open Excel and copy the content of the Clipboard.
- The processed payment information is copied in the file (number, name, amount, date, etc.). Save the Excel file.


How to upcoming transactions report ?
Upcoming transactions are those which have not yet been sent to the financial institution.
To view the upcoming transactions report, proceed as follows:
- Access the ACCEO Transphere homepage.
- Click Transactions and select Upcoming. The list displays the transactions which are submitted or are pending submission, but which have not yet been sent to the financial institution. The transactions are displayed by date.
- To refresh the data in the list, click the Refresh
 button.
 - To copy the content from the list to import it into Excel, click the Copy to clipboard
 button. A message requests confirmation.
 - Click OK. A message indicates that the content has been copied successfully.
- Open Excel and copy the content of the Clipboard.
- The upcoming transactions information is copied in the file (number, name, amount, date, etc.). Save the Excel file.
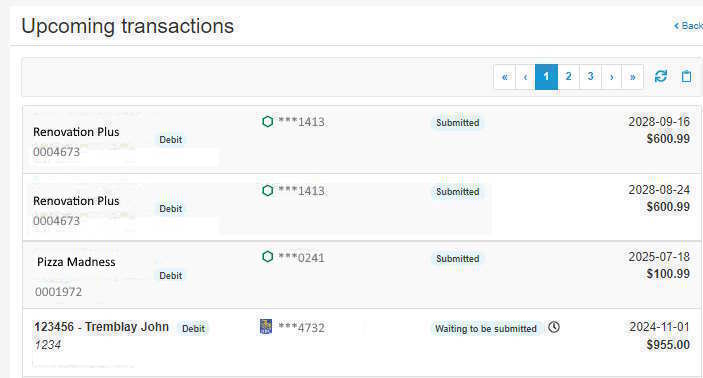

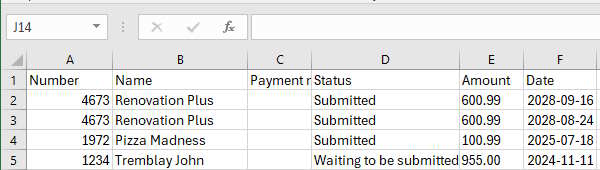
Note: Transactions Waiting to be submitted are not copied in Excel.